S.T.E.A.M
Science, Technology, Engineering, Art, Math
The following activities should be done with parental supervision.
Click on the activity title to watch the YouTube video.
Each week I will add more activities. Happy creating!
This week the STEAM projects are found on the art page. Try the sun prints and the hammered botanical. Both of these projects incorporate science and art!
Fun with Bubbles!
This week let's explore bubbles! Whether your in Pre-K or 8th grade doesn't matter, bubbles are a lot of fun.
The simplest bubble recipe is 1/2 cup dish soap (Dawn is the best), 1 1/2 cups of water, and 2 teaspoons of sugar. Stir till ingredients are combined.
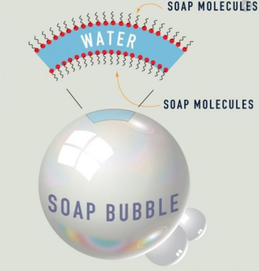
Most bubbles recipes will ask for corn syrup or sugar. The reason for the sugar is simple, it strengthens the bubble. Let's look at this a little closer. The picture show the anatomy of a bubble. Bubble walls are made of a 3 layers- soap molecules on the outside layer, in the middle there is water, and then an inner layer of soap molecules. When the water evaporates the bubble pops. When we add sugar to the mix it helps strengthen the soap molecules helping the bubble last longer. It's important to note that adding more sugar will not make a really strong bubble. Adding too much sugar will make a mess that does not make bubbles. When making any recipe it is always best to follow the recipe. To make more you can double the recipe- 1 cup of dish soap, 3 cups of water, and 4 teaspoons of sugar.
Click on the links for a few projects you can do with with bubbles
** store bought bubbles work for these projects**
Homemade Bubble Wands
Lots of fun ideas!
Square and Triangle Bubbles
Have fun and take lots of pictures!!
Earthquake Investigation
Click here to watch the video
Click here to download the investigation form
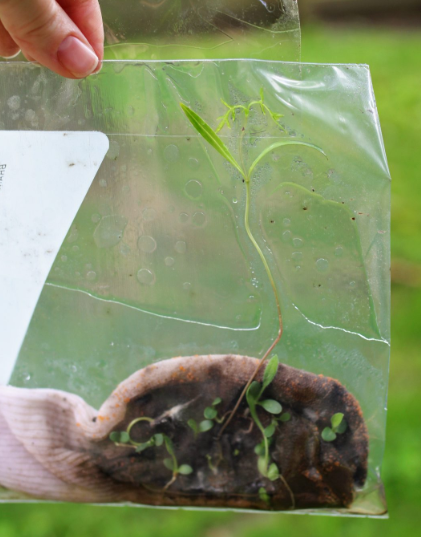
Sock Hike
Materials: Old cotton socks, plastic bag (gallon size), tape, water.
Before you go outside put an old pair of socks over your shoes. Run around, go for a hike, get your socks nice and dirty. As you are hiking, running, playing ...., you're socks are collecting seeds (like a bee collecting pollen) Before you are finished get your socks nice and muddy, the dirt will help the seeds grow. Place your socks in a plastic bag with a bit of water. Tape the plastic bag to a sunny window. Watch it grow!
Marbled Milk Paper
Growing Crystals
Catapult
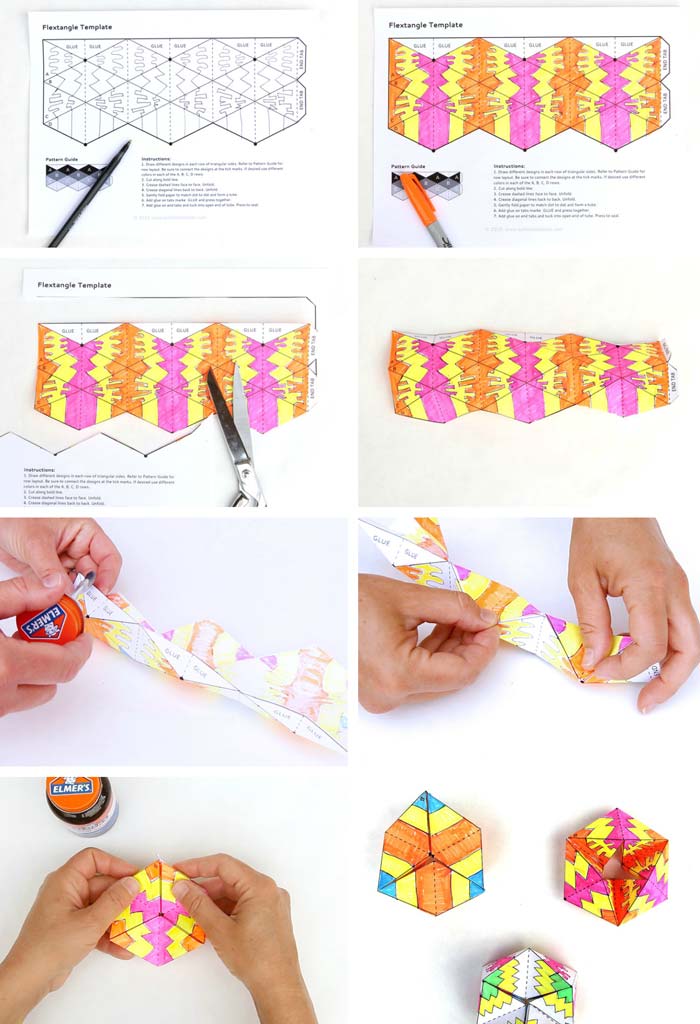
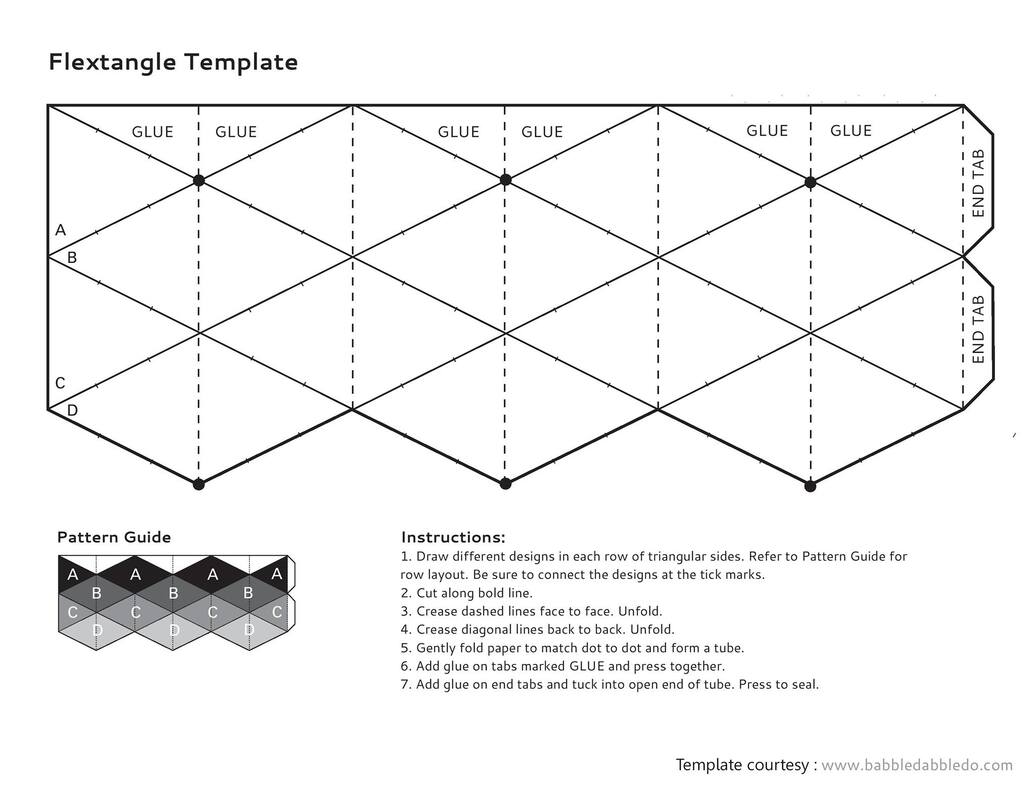
Flextangle
(Template is below)
Materials
Cardstock, Template, Pen ,Markers, Scissors, Glue, Tape,
Step One
print the template
Step Two
Draw different designs in each row of triangular sides. Refer to the Pattern Guide on our template for the row layout. Be sure to connect the designs at the tick marks.
Step Three
Cut along bold line.
Step Four
Crease dashed lines face to face. Unfold.
Step Five
Crease diagonal lines back to back. Unfold.
Step Six
Gently fold paper to match dot to dot and form a tube.
Step Seven
Add glue on tabs marked GLUE and press together.
Step Eight
Add glue on end tabs and tuck into open end of tube. Press to seal. Let dry. You’re done! Go play!
Troubleshooting
If you find the end tabs keep popping out, add a small piece of tape on both sides of the joint. Use tacky glue and be sure it is dry before rotating your Flextangle! The glued joints are under stress so they need to be secure. Be sure to prime the Flextangle by rotating it slowly and popping out any unwanted bumps. The paper needs to flex a few times slowly before it rotates easily. Make sure the folds are creased well. I burnish the fold with the back of my thumb. When using card stock you may want to burnish the folds using your fingernail.